A thorough understanding of frame sizes and how to measure eyeglasses is an important part of buying and designing sunglasses. Fortunately, Glasses Measurements is actually very simple! Here’s a helpful guide to understanding eyeglass sizes and measurements, written by iDetail Sunglasses Manufacturers.
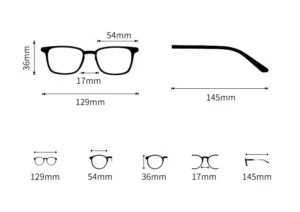
To ensure that your frames fit your face correctly, you must first determine the best frame size. The best place to start is to read this guide carefully and analyze the head dimensions of you or your client base.
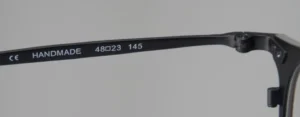
You can usually find the size on the inside of the temple of your glasses or on the lens, and frame size is usually shown as three numbers separated by dashes, such as 48-19-135mm (in inches). These 3 numbers reflect the size of different parts of the frame. The meaning is that 48 represents eye rim size, 19 represents nose bridge size, and 135mm represents glasses temple size.

1. Glasses Measurement – Eye Rim Size of Eyewear Width (Size A)
1. 1 How to measure glasses’ eye rim A size –Method:
Put the former in the rim, with the rim lock line on the former aligned with the rim lock milling point of the rim. Then use a caliper to measure the inner gap of the rim, which must be parallel to the horizontal axis of the rim. The maximum value you get is A1 (refer to Pic 1).
Note:
(1). The actual rim size (for full rim) “A”= A1+2a ( “a” is the groove depth of the rim wire). Tolerance: ±0.3mm.

(2). For half-rim or rimless frames, the value you get is the actual rim size A (ref# to pic. 2).
(3). For full rim with T-rim wire, the measurement is the same as half rim (refer to Pic. 2)
eg.
Suppose the boxing rim size is 50mm, and the groove depth of the rim wire is 0.5mm, then the value you get (A1) should be 49mm, it is: 49mm+2×0.5mm=50mm
–When A1 is between 49±0.3mm, it is acceptable;
–And if A1 is out of 49±0.3mm, it is not acceptable.
2. Glasses Measurement – Eye Rim Size of Eyewear Depth (Size B)
2. 1 How to measure glasses’ eye rim B size –Method:
Put the former in the rim, with the rim lock line on the former aligned with the rim lock milling point of the rim. Then use a caliper to measure the inner gap of the rim, which must be parallel to the vertical axis of the rim. The maximum value you get is B1 (refer to Pic 1).
Note:
(1). The actual rim depth (for full rim) “B”= B1+2a ( “a” is the groove depth of the rim wire). Tolerance: ±0.3mm.

eg.
Suppose the boxing rim depth is 30mm, and the groove depth of the rim wire is 0.5mm, then the value you get (B1) should be 29mm, it is: 29mm+2×0.5mm=30mm
–When B1 is between 29±0.3mm, it is acceptable;
–And if B1 is out of 29±0.3mm, it is not acceptable.
3. Glasses Measurements – Bridge Size of Eyewear Depth (DBL)
Definition: The bridge size, which is initialed as DBL, is the horizontal Distance Between two Lenses
3.1 Measuring Bridge Size of Eyewear Method:
Use a caliper to measure the inner side of two rims, which are beside the bridge, and must be parallel to the horizontal axis of the frame. The minimum value you get is C1(refer to the drawing below)
Note:
(1). The actual bridge size (for full rim) “DBL”= C1-2a ( “a” is the groove depth of the rim wire). Tolerance: ±0.3mm.
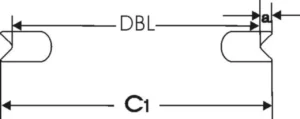
(2). For a half-rim or rimless frame, the “DBL”= L2 (refer to the drawing below). It is the actual value you get using the caliper according to the method above mentioned.

eg.
Suppose the boxing bridge size is 20mm, and the groove depth of the rim wire is 0.5mm,
For full rim style, then the value you get (C1) should be 19mm, it is: 19mm+2×0.5mm=20mm,
–When C1 is between 19±0.3mm, it is acceptable
–And if C1 is out of 19±0.3mm, it is not acceptable.
And for half-rim or 3-pcs, then the value you get(L2) should be 20mm.
–When L2 is between 20±0.3mm, it is acceptable;
–And if L2 is out of 20±0.3mm, it is not acceptable.
4. How to measure eyeglasses: Distance Between the Top of the Bridge and the Top of the Rim
4.1 Eyeglass Measuring Method:
Put the front of the frame, which with formers fitted, into the Parallel Clamp, then use a caliper to measure the distance between the top of the bridge and the underside of the moving bar (refer to H1 of the below drawing)

Or you can measure it with a simple method, just put the top of the front onto a flat, then use a caliper to measure the distance between the top of the bridge and the flat (refer to H2 of the below drawing). Tolerance: ±0.3mm

5. Eyewear Measurement of Bridge
5.1 Thickness of Bridge
Put the front on its front view, then measure its vertical thickness with a caliper(refer to “T” of drawing “a” below).
Tolerance: ±0.05mm
5.2 Width of Bridge
Put the front on its top view, then measure its vertical thickness with a caliper(refer to “W” of drawing “b” above ).
Tolerance: ±0.05mm
5.3 Length of Bridge
Measure the distance between the left and right ends of the bridge with a caliper(refer to “L” of drawing “c” above).
Tolerance: ±0.2mm
5.4 Curve of Bridge
Put the bridge onto the standard curve drawing or mold and check if it’s matching or not.
If yes, it’s acceptable
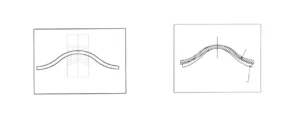
If not, it’s not acceptable.
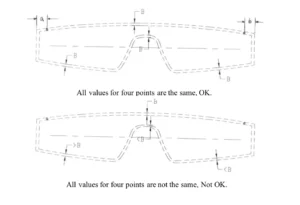
6. Measurement of Browbar Size
6.1 Width constancy of the whole brow
Use a caliper to measure the width of the brow at least at four points as indicated below. Then check if all the values are the same. The tolerance is ±0.05mm. (Refer to the drawing below).
6.2 Thickness of the brow
Use a caliper to measure the thickness of the brow at least at four points. Then check if all the values are as the specification. Usually, the thickness of the brow plaque should be 1.2mm, 1.0mm, and 0.8mm, etc.
6.3 Symmetry of the screw or pin
To check if the values of “a” & “b” as indicated in the above drawing are equal. If yes, OK, if not, Not OK.
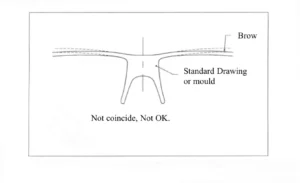
6.4 Curve of the brow
Put the brow onto the standard technical drawing or mold to see if they coincide with each other. If yes, the curve of the brow is acceptable, if not, it’s not acceptable.
6.5 Symmetry of the brow
By visual check. The distance between the left and right ends of the bar and the frame axis should be the same.
7. Measurement of the Pad Arm Box
- Use a caliper or an auxiliary tool to measure all the sizes of length, width, depth, thickness, and so on, and to see if all the sizes are as the requirement of the specification or technical drawing.
- Assemble the nose pad to check the movement of the nose pad. The scope of the moving should be between 20 and 25 degrees. The angle of the nose pad on the left and right should be the same.
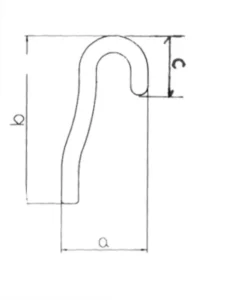
7.1 Measurement of the Pad Arm
Method:
Use a caliper to measure the “a”, “b” and “c” as indicated below.
Result:
All the samples measured should be with the same value for “a”, ”b” or “c”. Tolerance: ±0.2mm
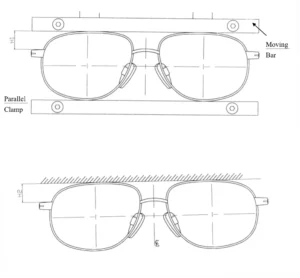
8. Measurement-Position of Glasses Endpiece(Trim)
Measuring Method:
Method One:
Put the front of the frame, which with formers fitted, into the Parallel Clamp, then use a caliper to measure the distance between the top of the endpiece (trim) and the underside of the moving bar (refer to H1 of the below drawing)
Method Two:
Or you can measure it with a simple method, just put the top of the front onto a flat, then use a caliper to measure the distance between the top of the endpiece (trim) and the flat (refer to H2 of below drawing).
8.1 Measurement of Glasses Endpiece(Trim)
Use a caliper to measure the front horizontal length of the endpiece (trim), as indicated as below.Tolerance:0.2mm
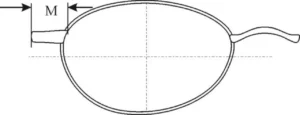
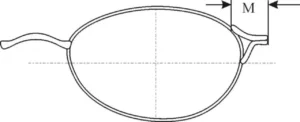
9. Measurement-Curve of Eyeglass Endpiece(Trim)
Put the endpiece (trim) onto a standard R ruler to see the matching of the curve of the endpiece and the ruler. Normally, we use a 2R and a 3R standard curve ruler to check the curve of the endpiece(trim).


Result:
Passed: If the curve of the endpiece has coincided with the R-ruler.
Failed: If the curve of the endpiece does NOT coincide with the R-ruler.
10. Glasses Measurement – Temple
10.1 Measurement of the Whole Glasses Temple Length Size:
Method:
Use a ruler or a caliper to measure the distance between the center of the hinge screw and the end tip of the temple. Please refer to the “L1” as below.
Tolerance: : ±1mm

10.2 Measurement of the Whole Metal Temple Length Size:
Method:
Use a ruler or a caliper to measure the distance between the center of the hinge screw and the end tip of the metal core. Please refer to the “L2” as above.
Tolerance: : ±1mm
10.3 Measurement of the Metal Temple Length:
Use a ruler or a caliper to measure the distance between the center of the hinge screw and the endpoint of the bevel of the metal temple. Please refer to the “L” as below.
Tolerance: : ±0.5mm

10.4 Measurement of the Metal Core Length:
Use a ruler or a caliper to measure the distance between the endpoint of the bevel of the metal temple and the end of the temple core. Please refer to the “h” as above.
Tolerance: : ±0.5mm
10.5 Measurement of the Length of Bevel:
It is the distance between the start point of the bevel and the end one. Use a caliper to check if it is within the requirement of the specification.
10.6 Measurement of the Diameter of the temple core:
Use a caliper to measure the diameter of the temple core. Please refer to the “D” as above
Tolerance: : ±0.02mm

10.7 Measurement of the Thickness and width of the temple:
Use a caliper to check the thickness (T) and width(B) of the temple.
Tolerance: : ±0.05mm
11. Measurement – Position of Glasses Pad Arm Box
Measuring Method:
Put the front of the frame, which with formers fitted, into the Parallel Clamp, then use a caliper to measure the distance between the top of the pad arm box and the underside of the moving bar (refer to H1 of below drawing)
Or you can measure it with a simple method, just put the top of the front onto a flat, then use a caliper to measure the distance between the top of the pad arm box and the axis of the frame (refer to H2 below drawing).
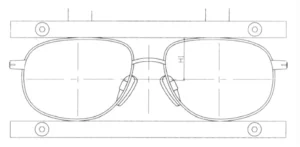
Tolerance:
For the distance between the top of the pad arm box and the top of the rim, the tolerance is60.3mm, with the differences between left and right must be within 0.2mm;
For the distance between the top of the pad arm box and the axis of the frame, the tolerance is 0.15mm, with the differences between left and right must be within 0.2mm;

12. Measurement-Size for sunglasses temple core
12.1 Length of Temple Core:
Use a caliper to check the distance between the milling point of the temple core and the start point of the bevel, as indicated “L” here below:
Tolerance: +0mm, -1.0mm

12.2 Diameter of Temple Core:
Use a caliper to check the diameter of the temple core, as indicated in “D” here below.
Tolerance for Nickel-Silver material:
Tolerance for Stainless material:

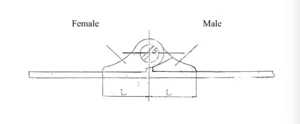
13. Measurement- Soldering point of the eyeglasses spring hinge case
Use a caliper to check according to the “Operation Instruction”.

14. Measurement – Soldering point of the glasses normal hinge
Use a caliper to check according to the “Operation Instruction”.
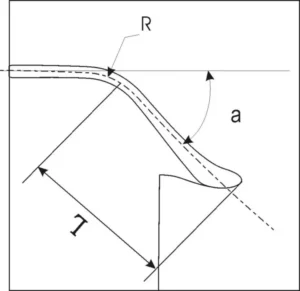
15. Measurement-Bending Angle of Glasses Temple Tip
(1). Put the bent temple tip into the standard bending template to see:
If the temple tip coincides with the template and the bending point is smooth, that’s OK, but if not, it’s not OK.
(2). Use a protractor with a moving adjusting level: Put one side of the protractor on the axis of the temple and then adjust the adjusting level to coincide with the axis of the bent temple tip, then check the angle on the scale.
Please refer to the αof here below. Tolerance: ±1°
16. Measurement – Inclination of Glasses Temple
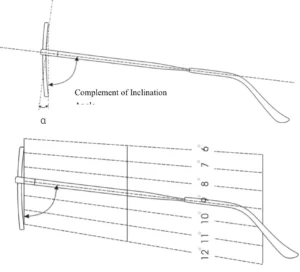
Hold a standard inclination angle gauge with one hand and hold the sample frame, with another hand. Open the temple and put the front inside of the frame onto the base of the gauge, keeping the vertical axis of the rim parallel with the base of the gauge, and move the frame slowly.
When the axis of the temple coincides with one of the scales of the gauge, then the angle of the scale is the inclination angle of the temple. Please refer to the drawing of here below.
Tolerance: ±1∘
17. Measurement – Opening Space of Eyeglasses Temple
Use a ruler or caliper to measure:
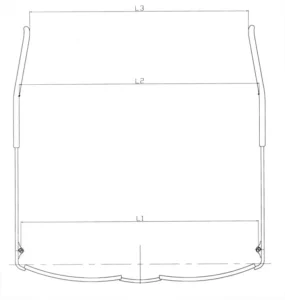
(1). The distance between the center of the right and left hinge screw, refer to “L1” here below drawing;
(2). The distance between the inside bending points of the right and left temple tip, referred to as “L2”;
(3). The distance between the inside end of the right and left temple tip, refer to “L3”.
Tolerance: ±2mm
18. Measurement – Opening Angle of Eyewear Temple
Method 1:
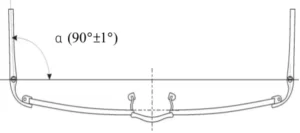
Put a ruler onto the inside of the front with the temple opened, then put one of the vertical sides of a vertical triangle ruler beside the ruler and check:
- If the temple is parallel with another vertical side of the triangle ruler or the angle between the temple and the vertical side of the triangle ruler is not more than 1 degree, it’s OK;
- If the angle between the temple and the vertical side of the triangle ruler is beyond 1 degree, it’s not OK.
Method 2:
Put the front inside with the temple opened to the base of a standard inclination angle gauge and then check by visual:
- If the temple axis is parallel with the vertical side of the gauge or the angle between the temple and the vertical side of the gauge is not more than 1 degree, it’s OK;
- If the temple axis is not parallel with the vertical side of the gauge and the angle between the temple and the vertical side of the gauge is more than 1 degree, it’s not OK.
19. Measurement Glasses – Hear Curve Space
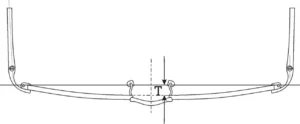
Put a ruler onto the inside of the front with the temple opened, then use a caliper to check the distance between the ruler and the rim wire inside which is near the bridge. Please refer to the “T” of the drawing below.
Tolerance: ±0.5mm
20. Measurement – Width of the Whole Glasses frame
Use a ruler to measure the distance between the outside of the right and left endpiece which is near the center of the hinge screw. Please refer to the “S” here below the drawing.
Tolerance: ±2mm

21. Measurement- Opening of Sunglasses Nose Pad
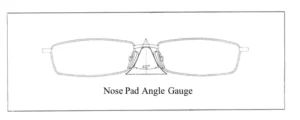
Put the front with the nose pad fitted onto the nose pad angle gauge. Then check visually if the right and left nose pads are symmetry and the angle of the two nose pads is 40 degrees. Please refer to the drawing below.
Tolerance: ±5 degrees
22. Measurement – Dropping of Glasses Endpiece
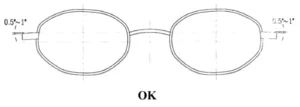
Put the front with the former fitted onto the transparent film with scale and check by visually the dropping of the endpiece. If the angle of the dropping is between 0.5 and 1 degree, it’s OK, and if out of this range, it’s not OK. Please refer to the drawings below.

23. Measurement – Base of Sunglasses Lens
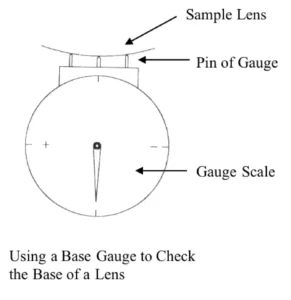
Use a base gauge or a standard base template to check.
For checking with a base gauge, please refer to the drawings below.
For checking with a standard base template, we can put a sample lens onto the template, If the curve of the lens coincides with the template, the base of the template is the one for the sample lens.
Usually, we have the standard base template for 4.5B, 5B, 6B, 8B and 9B etc.
Tolerance: 0.25dpt.
24. Some Helpful Tips for Glasses Measurements
Making sure your glasses fit properly is essential for comfort and clear vision. Ill-fitting glasses can cause discomfort, blurred vision, and headaches, interfering with your daily activities. Frame size is usually a combination of lens width, frame width, bridge width, and temple length. This comprehensive guide provides helpful tips on eyewear measurements, making it important to choose the right frame size for your face shape. Helping you find and design the perfect glasses to fit your needs.

Lens width: The diameter of the lens, which affects the field of vision. For example, 48mm.
Nose bridge width: The distance between the two lenses, affects how well the glasses sit on the nose. For example, 17mm.
Temple length: Refers to the length of the arms of the glasses, which is crucial for comfort behind the ears. For example, 135mm.
24.1 Find the Perfect EyeRim or lens width
Measure the widest point of the lens, horizontally across the lens from edge to edge.
The ideal spectacle frame state should be: the optical center of the lens is exactly at the center of the wearer’s pupil, so at this time, the wearer’s vision will not produce a prism effect.
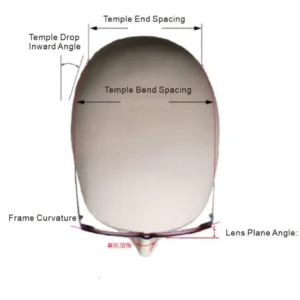
In addition, the frame size is 33-59mm in odd numbers and 34-60mm in even numbers. Taking children’s frames as an example, the common sizes are 40~48; the common sizes of adult frames are 50~56;
24.2 Pick the Right Bridge width
Measure the space between lenses. The bridge should fit snugly, not too tight or too loose.
The bridge should sit comfortably on your nose. Choose the appropriate nose bridge size according to the distance between your eyes and the size of the bridge of your nose. Please measure the distance between your eyes. If it is smaller than the bridge of your nose, the number should be smaller. This number should be larger if you have wider eyes or want a wider nose bridge.
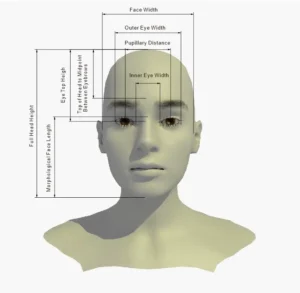
Also the position of your nose will help determine which frame style is best for you. If your nose is higher on your face, you may want a frame style with a smaller distance between your nose bridge and your brow line. If your nose is located lower on your face, consider frames with a lower bridge and a curved brow line.
The nose bridge size is 13-21mm in odd numbers and 14-22mm in even numbers. Taking children’s frames as an example, the common sizes are 15 or 16mm; the common sizes of adult frames are 16~18mm, and the nose bridge size of some retro styles can reach 20mm or even 23mm.
24.3 Understand the temple length
Measure the full length of the temple from the center of the hinge screw to the back tip.
The temple size is 125-155mm in odd numbers and 126-156mm in even numbers. Taking children’s frames as an example, the common sizes are 120~135mm; the common sizes of adult frames are 140-145mm;
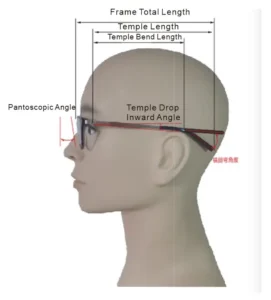
24.4 Tips for choosing the right frame size
Face Shape: The frame shape should contrast with the shape of your face. For example, round faces look good with square or rectangular frames.
Color: Choose a color that suits your skin tone, hair color, and personal style.
Material: The frame material can be metal, plastic, or titanium. Consider durability, weight, and hypoallergenic properties.
The importance of interpupillary distance: Interpupillary distance (PD) is the distance between the centers of pupils. Proper alignment of the lens to the eye is crucial.
In Conclusion Glasses Measurements
Proper eyewear measurements can greatly enhance your eyewear experience. It’s worth taking the time to get accurate measurements and choose the right frame size and shape. Opticians and designers can provide professional help to ensure your glasses fit properly and provide optimal comfort and vision.
This guide provides a comprehensive overview of eyewear measurements. This is a helpful resource for anyone looking to enhance their eyewear experience and comfort. By understanding and applying these tips, you can find the perfect pair of glasses to suit your needs and style, which can help you build your own eyewear brand and improve your efficiency with custom sunglasses manufacturers.

1 thought on “Glasses Measurements & Frame sizes”
Hello, my dear one, I would like to express my admiration for this exceptionally well-written post that encompasses nearly all pertinent information. I eagerly await further postings of the same caliber.